Day Of The Dead Cookies: A Celebration of Flavor and Culture
Embrace the vibrant traditions of Día de los Muertos with a delightful twist on your favorite treat: Day Of The Dead Cookies. Drenched in vibrant colors and adorned with whimsical decorations, these cookies evoke a sense of nostalgia and celebration with every bite. Imagine the sweet aroma of buttery cookies wafting through your kitchen, mingling with the heartfelt laughter of family gathering around the table. Not only are these cookies fast to make, but they also provide a kid-friendly activity that every member of the family will enjoy. Get ready to craft unique edible masterpieces while imbibing the spirit of remembrance and joy that this holiday is all about.
Are You Ready for a Sweet Adventure?
What if you could turn a simple cookie into a vibrant celebration? Can you picture the joy of creating colorful decorations and indulging in sweet, buttery flavors that melt in your mouth? Just imagine biting into a cookie that bursts with flavor and a visual feast for the eyes—how could you resist making these Day Of The Dead Cookies?
Why You’ll Love This Recipe
These Day Of The Dead Cookies are ridiculously easy to prepare, making them perfect for kitchens of all skill levels. With minimal ingredients and uncomplicated methods, this recipe allows you to focus on creativity without the stress. They make an amazing crowd-pleaser for gatherings or a sweet family project that brings memories of past celebrations flooding back. Plus, they offer a canvas for artistic expression, making them the perfect activity for kids and adults alike.
Ingredients
To create these easy-to-make, colorful Day Of The Dead Cookies, gather the following ingredients for a truly sensational baking experience:
- 3 cups all-purpose flour, plus more for surface
- 1 tsp. baking powder
- 1/2 tsp. kosher salt
- 1 cup (2 sticks) butter, softened
- 1 cup granulated sugar
- 1 large egg
- 1 Tbsp. milk
- 1 tsp. pure vanilla extract
- 5 cups powdered sugar
- 6 Tbsp. milk, plus more for thinning
- 1/4 cup light corn syrup
- 1/4 tsp. pure vanilla extract
- Black food coloring
- Teal food coloring
- Orange food coloring
- Green food coloring
- Purple food coloring
- Yellow food coloring
Each ingredient contributes to the intoxicating sweetness and unforgettable texture of these cookies. The buttery essence blended with the sugary notes of the icing will dance on your taste buds, making every bite feel like a vivid celebration of life and love.
Timing
This cookie adventure can be both fast and indulgent. The preparation can take less than thirty minutes, and with a swift chill in the fridge, these can be ready to bake in no time. However, if you’re feeling luxurious and want to relish in the creative process, give yourself an hour or more to enjoy decorating each cookie until your heart’s content.
Step-by-Step
Creating Day Of The Dead Cookies is a delightful experience. Here’s how you can make them, step by step:
In a large bowl, whisk together 3 cups of flour, 1 tsp. baking powder, and 1/2 tsp. kosher salt. Set aside this dry mixture to blend harmoniously with the wet ingredients later on.
In another large bowl, beat 1 cup (2 sticks) of softened butter and 1 cup of granulated sugar together until fluffy and pale in color. This step transforms your batter into a cloud-like texture, promising an irresistible cookie base. Add 1 large egg, 1 Tbsp. milk, and 1 tsp. pure vanilla extract into the mix. Keep beating until fully combined.
Gradually add the dry flour mixture into the wet ingredients. As you mix, you’ll witness the batter come together into something incredible.
Shape the dough into a disk and wrap it in plastic. Place it in the refrigerator for at least 1 hour, allowing the flavors to meld beautifully.
When you’re ready to roll, preheat your oven to 350°F (175°C) and line two baking sheets with parchment paper. Lightly flour your surface, then roll out the dough until it’s 1/8 inch thick. Using a skull cookie cutter, cut out shapes and transfer them to your prepared baking sheets. For the best shapes, freeze them for 10 minutes before baking.
Bake the cookies until their edges are lightly golden, about 10 to 12 minutes. Once baked, let them cool completely.
Now it’s time for the icing! In a medium bowl, combine 5 cups of powdered sugar, 6 Tbsp. milk, corn syrup, and 1/4 tsp. vanilla extract. Mix well until you achieve a thick, yet spreadable consistency.
Transfer a quarter of the icing into a piping bag fitted with a small round tip to outline the edges of the cookies.
Pour about half of the remaining icing into another bowl and thin it out with 1 teaspoon of milk at a time until it achieves a good flooding consistency. Transfer this into another piping bag for the filling.
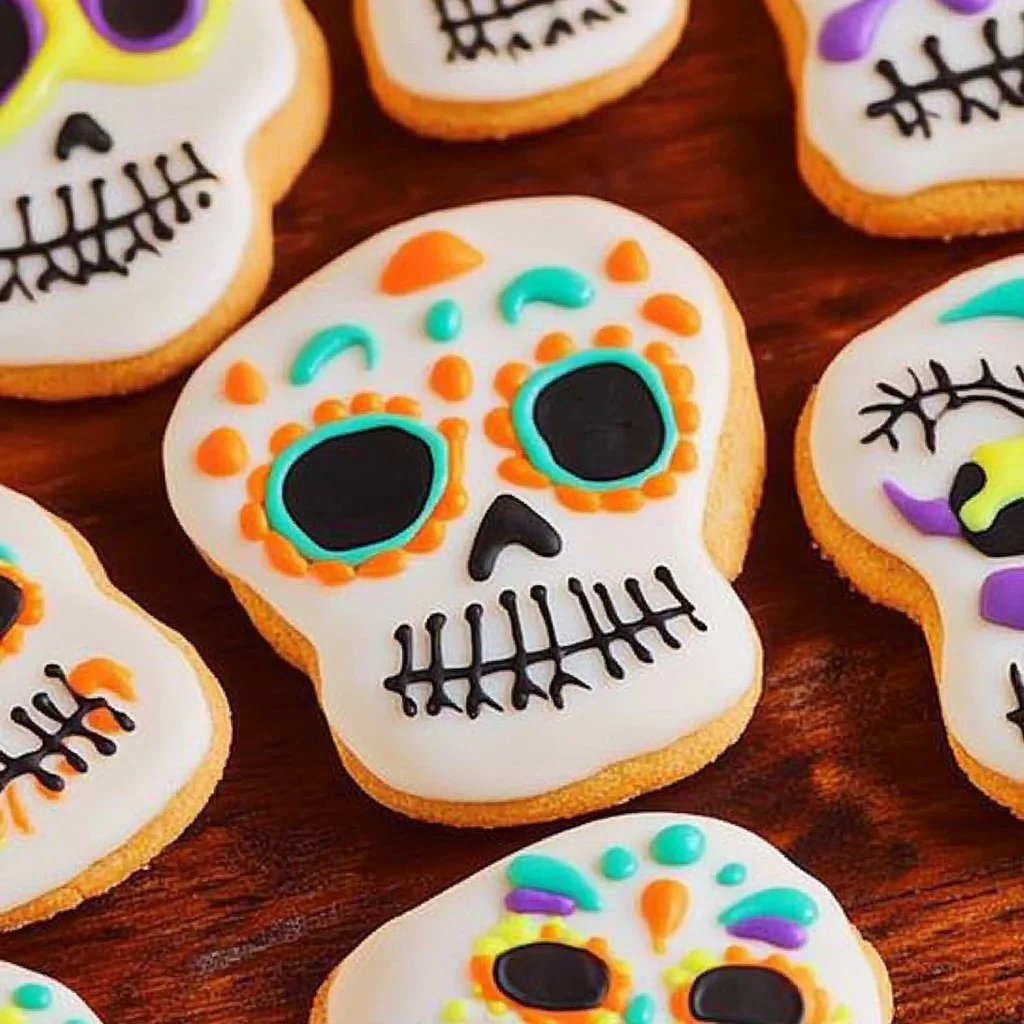
Divide the remaining icing into 6 separate bowls and dye them with black, teal, orange, green, purple, and yellow food coloring.
Place each color into separate piping bags and unleash your creativity by piping decorative faces onto the cookies.
These steps lead to a visually stunning treat that’s sure to spark joy!
Nutritional Information
Delight in the indulgence of these cookies without counting every calorie. One cookie has approximately 150 calories, offering a lovely treat while keeping your indulgence manageable. Allow yourself to loosen up and savor that occasional sweet reward.
Healthier Alternatives
For those seeking a lighter version or specific dietary preferences, there are plenty of alternatives! Try substituting the butter with unsweetened applesauce for a fruitier taste or using coconut oil for a dairy-free option. Utilizing sugar-free powdered sugar can help reduce the sweetness if desired.
Serving Suggestions
These cookies make for a delightful celebration centerpiece, perfect for family gatherings or special occasions like Día de los Muertos! Pair them with a scoop of vanilla ice cream for an even more extravagant indulgence that will satisfy any sweet tooth.
Common Mistakes
Avoid the all-too-common pitfalls such as overbaking your cookies, which results in a dry texture. Make sure to monitor the baking time closely. Also, resist the urge to skip the chilling step, as this helps the cookies maintain their shape and texture. Leaving icing too thick can cause messy decorations, so be sure to find that perfect consistency for smooth piping.
Storing Tips
Keep your cookies fresh by storing them in an airtight container for up to a week. For longer storage, freeze your cookies and icing separately in airtight bags for easy access anytime you crave a festive treat. To enjoy later, let the frozen cookies thaw at room temperature before decorating with icing.
Temptation to Bake!
Why wait another minute? With their vibrant colors, delicious flavors, and striking designs, these Day Of The Dead Cookies are a must-bake. They’ll bring joy, creativity, and deliciousness right to your kitchen, perfect for sharing with family and friends.
FAQs
Can I make the dough ahead of time?
Yes! Refrigerate the dough for up to 3 days or freeze it for later use.What is the best way to achieve vibrant colors in icing?
Start with gel food coloring for these cookies; it provides deep, rich colors without affecting the icing consistency.Can I use store-bought icing?
Absolutely! If you’re short on time, store-bought icing is a convenient option, but homemade typically tastes better and allows for customization.How can I make these cookies gluten-free?
Substitute all-purpose flour with a gluten-free blend and ensure all other ingredients are gluten-free.Can I add flavors to the dough?
Definitely! Options like almond extract or lemon zest can enhance the flavor profile of your cookies.
These Day Of The Dead Cookies will transform your kitchen into a vivid celebration of culture and flavor. Prepare to create delicious memories as you bake, decorate, and savor each sweet bite!
PrintDay Of The Dead Cookies

Celebrate Día de los Muertos with vibrant and delightful cookies that capture the spirit of the holiday.
- Prep Time: 30 minutes
- Cook Time: 12 minutes
- Total Time: 42 minutes
- Yield: 24 cookies 1x
- Category: Dessert
- Method: Baking
- Cuisine: Mexican
- Diet: Vegetarian
Ingredients
- 3 cups all-purpose flour, plus more for surface
- 1 tsp. baking powder
- 1/2 tsp. kosher salt
- 1 cup (2 sticks) butter, softened
- 1 cup granulated sugar
- 1 large egg
- 1 Tbsp. milk
- 1 tsp. pure vanilla extract
- 5 cups powdered sugar
- 6 Tbsp. milk, plus more for thinning
- 1/4 cup light corn syrup
- 1/4 tsp. pure vanilla extract
- Black food coloring
- Teal food coloring
- Orange food coloring
- Green food coloring
- Purple food coloring
- Yellow food coloring
Instructions
- In a large bowl, whisk together flour, baking powder, and salt. Set aside.
- In another bowl, beat butter and sugar until fluffy. Add egg, milk, and vanilla; mix until combined.
- Gradually add dry mixture to wet ingredients until dough comes together.
- Shape dough into a disk, wrap in plastic, and refrigerate for at least 1 hour.
- Preheat oven to 350°F (175°C) and line baking sheets with parchment paper.
- Roll dough to 1/8 inch thick and cut shapes with a cookie cutter. Freeze for 10 minutes.
- Bake for 10-12 minutes until edges are lightly golden. Cool completely.
- For icing, mix powdered sugar, milk, corn syrup, and vanilla until thick.
- Use piping bags to outline and flood cookies using colored icing for decoration.
- Let the decorated cookies set before serving.
Notes
Avoid overbaking to prevent dryness, and chill dough to maintain shape during baking.
Nutrition
- Serving Size: 1 cookie
- Calories: 150
- Sugar: 10g
- Sodium: 100mg
- Fat: 7g
- Saturated Fat: 4g
- Unsaturated Fat: 2g
- Trans Fat: 0g
- Carbohydrates: 22g
- Fiber: 0g
- Protein: 2g
- Cholesterol: 30mg