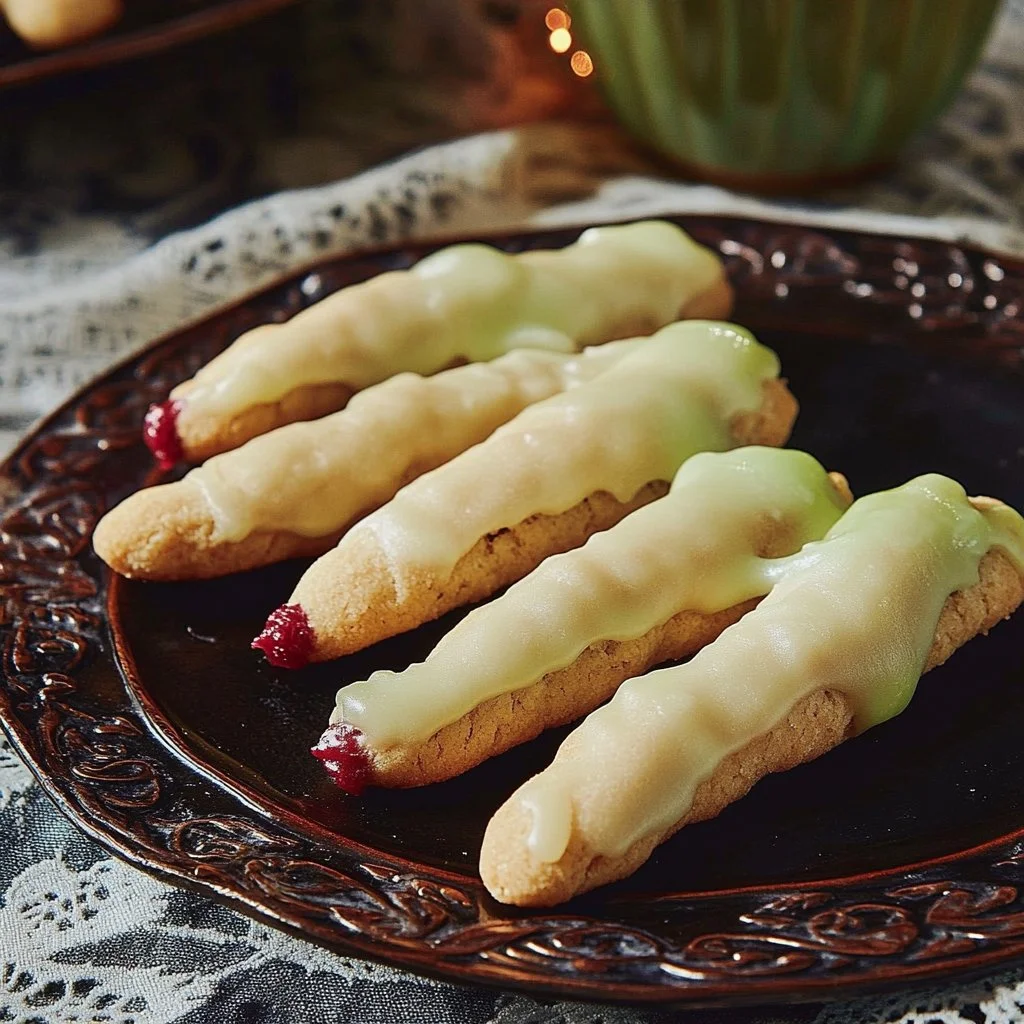
Witch Finger Cookies
There’s something magically nostalgic about baking, especially when it involves creating spooky treats like Witch Finger Cookies. These delightfully eerie cookies not only captivate the imagination, but they also indulge the taste buds with their soft, buttery texture and crafty creation method. Picture yourself rolling out vibrant green dough, shaping them into finger-like forms, and adding delightful almond "nails"—every detail contributing to a fun, hands-on experience.
Perfect for Halloween or any get-together where playful treats are welcomed, these cookies strike the right balance between whimsically frightening and deliciously sweet. With a minimal ingredient list and quick prep time, you’ll find that this recipe will be a hit with kids and adults alike. So roll up your sleeves and get ready to create some hauntingly good cookies that are sure to leave everyone enchanted!
Are You Ready for a Spooky Sweet Surprise?
Have you ever craved a treat that not only satisfies your sweet tooth but also brings a playful twist to your gathering? What if those treats looked like something from a spine-chilling tale but tasted divine? Witch Finger Cookies offer that perfect blend, bringing a devious delight to gatherings and special occasions alike.
Imagine the delighted giggles as you’re unrolling dough and shaping it into ghoulish shapes, all while filling your kitchen with tantalizing aromas. This recipe is a perfect way to spark creativity and engage family and friends in the kitchen!
Why You’ll Love This Recipe
Quick and Easy Prep: With simple steps and straightforward ingredients, you’ll whip these cookies up in no time!
Kid-Friendly: Engage your little ones in the kitchen; rolling out and shaping these cookies is a fantastic way to bond.
Minimal Ingredients: You won’t need to scour specialty stores for anything; most items are common household staples.
Crowd-Pleaser: The whimsical design is sure to be the star of any potluck or Halloween party!
Ingredients
To create these bewitching cookies, gather the following delightfully indulgent ingredients:
1 1/4 cups confectioners’ sugar – sweet and silky, it will add the perfect sugary touch.
1 cup unsalted butter, softened – rich and creamy, creating a melt-in-your-mouth texture.
1 large egg – for binding and fluffiness, giving the cookies that appealing softness.
1 tsp almond extract – a hint of warmth and nostalgia infused in each bite.
1 tsp pure vanilla extract – for that beloved classic flavor, it pairs beautifully with almond.
5 to 6 drops green food coloring – to create that vibrant, creepy look.
2 3/4 cups all-purpose flour – the foundation of your dough, yielding an inviting softness.
1 tsp kosher salt – enhancing the sweetness and balancing flavors.
1/2 cup finely chopped pistachios – offering a crunchy surprise inside the tender cookie.
3/4 cup sliced almonds – perfect for crafting added detail and dimension as "nails."
1/2 cup cherry, strawberry, or raspberry jam – this ooey-gooey treat will be the crowning glory of your cookies.
Timing
These Witch Finger Cookies offer a swift escape into the world of baking. The prep is engaging yet effortless, allowing you to wrap everything up in approximately an hour. With chilling time, you’ll find yourself indulging in these haunting delights—fast enough to bake on a whim and decadent enough to make every bite feel like a luxurious indulgence.
Step-by-Step
In a large bowl, beat together the confectioners’ sugar and butter until pale and fluffy. The mixture should feel light, airy, and oh-so-inviting. Add the egg and mix until the texture becomes fluffy. Pour in the almond extract, vanilla extract, and the food coloring, continuing to mix until all components are well incorporated. The striking green hue will add to the spooky vibe!
In a small bowl, whisk together the flour and kosher salt. Gradually add this flour mixture to the butter mixture, blending until just combined. Gently fold in the finely chopped pistachios, bringing a delightful earthy crunch into the mix. Cover your dough with plastic wrap and refrigerate it for at least 30 minutes. This step will help in shaping your fingers perfectly later.
Preheat your oven to 375 degrees Fahrenheit. Once chilled, roll pieces of your dough into finger shapes. Press sliced almonds onto the front of each cookie to serve as spooky nails, and create knuckles by gently pressing down with your fingertips. Freeze the prepared cookies for 30 minutes to ensure they hold their shape during baking.
Bake the cookies in your preheated oven until the edges become firm, typically about 15-20 minutes. Your kitchen will be filled with a delicious buttery aroma as they cook. Let them cool for a moment, then add a dollop of jam beneath the almond “nails” and also spread a bit on the bottom of the cookie. This gooey, colorful jam adds a wonderful surprise!
Finally, let your cookies cool completely before displaying them on a platter or diving in yourself. The final result? An allure of haunt and sweetness you won’t soon forget!
Nutritional Information
Per cookie, you’re looking at roughly 150 calories. While each Witch Finger Cookie is indulgent, they’re not so guilt-ridden that you can’t share them with friends. Enjoying these delights now and then is the essence of balance in any diet!
Healthier Alternatives
Looking to lighten the load? You can convert this recipe into a lower-sugar version by using sugar substitutes like erythritol or monk fruit sweetener. If you’re aiming for a dairy-free version, swap the butter with coconut oil or vegan alternatives. This way, you won’t lose that delightful taste while catering to different dietary needs.
Serving Suggestions
These Witch Finger Cookies are perfect for any festive occasion! Serve them at Halloween parties, with ice cream during movie nights, or alongside a warm cup of apple cider in the fall. The creative presentation will spark excitement and adds a fun twist to any dessert table!
Common Mistakes
Ensure you avoid common baking pitfalls, such as overbaking your cookies, which can lead to dry, crumbly desserts. Pay attention to the chill time—rushing this can affect the shaping of the fingers. Also, be gentle when handling the dough to prevent it from becoming tough; you want cookies that are soft and delectable, not hard and dense.
Storing Tips
Store your Witch Finger Cookies in an airtight container at room temperature for up to one week. If you’d like to enjoy them later, consider freezing portions of the unbaked dough. Just roll and freeze the shaped cookies before baking them whenever you’re ready for a spooky snack!
Tempt to Bake It ASAP
With the sweet and spooky allure of these Witch Finger Cookies, it’s impossible not to want to dive into the kitchen. Their engaging preparation process, combined with a blend of flavors and textures that are simple to master, makes this a recipe worth trying. So gather your ingredients, summon your courage, and bake these enchanting treats today!
FAQs
Can I use flavored extracts other than almond?
Absolutely! You can experiment with other flavors like coconut or hazelnut for a unique twist.How do I prevent sticking while shaping the cookies?
Lightly flour your hands or the surface you’re working on to keep the dough from sticking.What type of jam works best for Witch Finger Cookies?
Cherry or raspberry jam provides a bright red color that enhances the spooky aesthetic.How can I make these cookies gluten-free?
Substitute the all-purpose flour with a gluten-free flour blend, ensuring it has xanthan gum for proper structure.Can I prep the dough ahead of time?
Yes! You can refrigerate the dough in advance and shape it into fingers when you’re ready to bake.
Now, don your aprons and get ready for some ghostly fun in the kitchen—your Witch Finger Cookies await!
Witch Finger Cookies
Ingredients
For the cookie dough
- 1 1/4 cups confectioners' sugar Sweet and silky for the perfect sugary touch.
- 1 cup unsalted butter, softened Creates a melt-in-your-mouth texture.
- 1 large egg For binding and fluffiness.
- 1 tsp almond extract Adds a hint of warmth.
- 1 tsp pure vanilla extract Pairs beautifully with almond.
- 5 to 6 drops green food coloring For a vibrant, creepy look.
- 2 3/4 cups all-purpose flour The foundation of your dough.
- 1 tsp kosher salt Enhances sweetness.
For decoration and filling
- 1/2 cup finely chopped pistachios Adds a crunchy surprise.
- 3/4 cup sliced almonds Used as spooky nails.
- 1/2 cup cherry, strawberry, or raspberry jam Adds color and flavor.
Instructions
Preparation
- In a large bowl, beat together the confectioners' sugar and butter until pale and fluffy.
- Add the egg and mix until fluffy, then incorporate the almond extract, vanilla extract, and food coloring.
- In a small bowl, whisk together the flour and kosher salt, then gradually add to the butter mixture until just combined.
- Fold in the finely chopped pistachios and refrigerate the dough for at least 30 minutes.
Baking
- Preheat your oven to 375°F (190°C).
- Roll the chilled dough into finger shapes and press sliced almonds onto the front as nails.
- Freeze the prepared cookies for 30 minutes, then bake for 15-20 minutes until edges are firm.
- Let cool slightly before adding jam beneath the almond nails and on the bottom of the cookie.
- Allow the cookies to cool completely before serving.